Notion Setup
Optional
Notion sync is optional — you can write and publish using the built-in editor without connecting Notion. But if you prefer writing in Notion, this guide covers how to set up your Notion database and connect it to Notipo for automatic status-driven publishing.
Required Properties
Your Notion database needs these properties:
| Property | Type | Required | Description |
|---|---|---|---|
| Name | Title | Yes | The post title (default Notion title column) |
| Status | Select | Yes | Controls the pipeline (see trigger statuses below) |
| Category | Select | Yes | Auto-populated from your WordPress categories after connecting WordPress |
| Tags | Multi-select | No | Auto-populated from your WordPress tags |
| Slug | Text | No | Custom URL slug for the WordPress post (auto-generated from title if left blank) |
| Featured Image Title | Text | No | Text overlay on the generated featured image (defaults to post title if blank) |
| SEO Keyword | Text | No | Focus keyword for Rank Math SEO optimization |
| SEO Description | Text | No | Custom meta description for SEO (max 160 chars). Auto-derived from post content if left blank. |
| WordPress Link | URL | No | Auto-filled by Notipo after sync (edit link) or publish (live URL) |
Tip
Property names are case-sensitive. "Status" is not the same as "status". Use the exact casing shown above, or duplicate the template to avoid issues.
Trigger Statuses
The Status property drives the pipeline. These are the default values (configurable in Settings):
| Status Value | What Happens | Status After |
|---|---|---|
| Post to Wordpress | Syncs content from Notion and creates a WordPress draft | Ready to Review |
| Publish | Publishes the existing WordPress draft live | Published |
| Update Wordpress | Re-syncs content from Notion to WordPress (auto-publishes if already live) | Published or Ready to Review |
| Ready to Review | Set automatically after sync | — |
| Published | Set automatically after publishing | — |
Add all five values as options in your Status select property. The template has these pre-configured. You can rename the trigger statuses in Notipo's Settings page if you prefer different labels.
Connecting via OAuth
Notion is connected via OAuth — no manual token setup needed.
Tip
Credentials, database ID, and webhooks are all configured automatically during the OAuth flow. Status changes are detected instantly via Notion webhooks.
- 1Go to Settings and click Connect to Notion
- 2You'll be redirected to Notion's authorization page. Review the permissions and click Next

- 1Choose Use a template provided by the developer to get the Notipo database template duplicated into your workspace automatically — with all required properties pre-configured. Or select Select pages to share if you already have your own database set up.
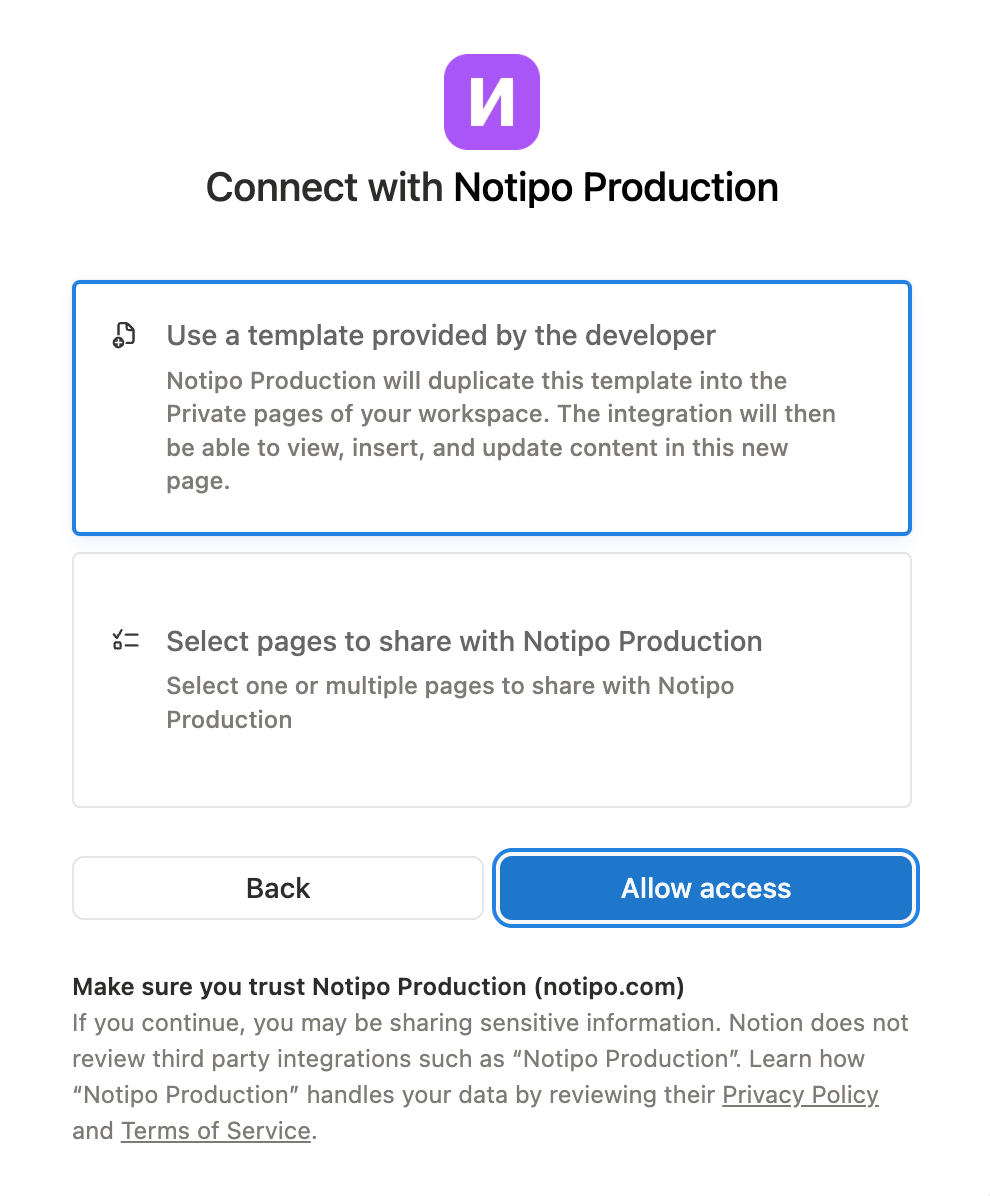
- 1Click Allow access
Tip
If you choose the template option, the database is created in your Private pages. You can move it to any workspace location after setup — Notipo will continue to access it via the OAuth connection.
Trigger Detection
Notipo detects status changes in two ways:
| Method | How It Works |
|---|---|
| Webhooks | Notion sends events instantly when pages change |
| Polling | Notipo queries the Notion API for pages with trigger statuses every 5 minutes |
| Sync Now | Manual button on the dashboard for instant polling |
Troubleshooting
"Notion not configured" or posts not syncing
- Try disconnecting and reconnecting Notion in Settings
- Check that the Status property options match the trigger statuses exactly (e.g. "Post to Wordpress", not "Post to WordPress")
Status changes not detected
- Click Sync Now on the dashboard to trigger an immediate poll
- Check that your Notion database is shared with the Notipo integration
Category and tag options not showing in Notion
- Categories and tags are synced from WordPress to Notion when you connect WordPress or when you click Sync Categories on the Categories page
- Make sure both Notion and WordPress are connected before syncing