Notion to WordPress Without a Plugin: One-Click Setup (2026)

Most guides recommend installing a Notion-to-WordPress plugin. Here's why you don't actually need one — and how the native WordPress Application Passwords API does the same job with fewer moving parts, better security, and zero plugin maintenance.
This guide covers the no-plugin approach (recommended), the main plugin alternatives in case you still want one, and the trade-offs on image handling, SEO metadata, and publishing triggers.
Why You Don't Need a WordPress Plugin
WordPress 5.6 (released December 2020) added Application Passwordsto core — a built-in way to authenticate REST API calls without a plugin. Any external service can connect to your WordPress install with one click: approve a request in wp-admin, get a token, done. That's the same API surface a plugin would use anyway, exposed natively.
What you avoid by skipping the plugin:
- Extra security surface — every plugin is a potential exploit vector
- Plugin conflicts with your theme, other plugins, or WordPress core updates
- Manual updates and maintenance inside wp-admin
- PHP version compatibility issues over time
- Vendor lock-in inside WordPress (you stay outside, content flows in)
The functional difference between the plugin path and the no-plugin path shows up in three areas: image handling, SEO metadata, and publishing triggers — covered below.
The No-Plugin Setup: Notipo + Application Passwords
Notipo connects to your WordPress site via the native REST API and an application password — created with one click in wp-admin. No plugin installed on WordPress. Publishing is triggered by a status change in Notion: set a page's status to “Publish” and Notipo syncs it to WordPress automatically.
Setup (under 10 minutes)
- Create a free account at notipo.com
- Connect your Notion workspace via one-click OAuth
- Click “Connect WordPress” → approve the application password request in wp-admin (one click)
- Duplicate the Notipo blog template into your Notion workspace (properties pre-configured)
- Write a post, set the status to Publish, Notipo handles the rest
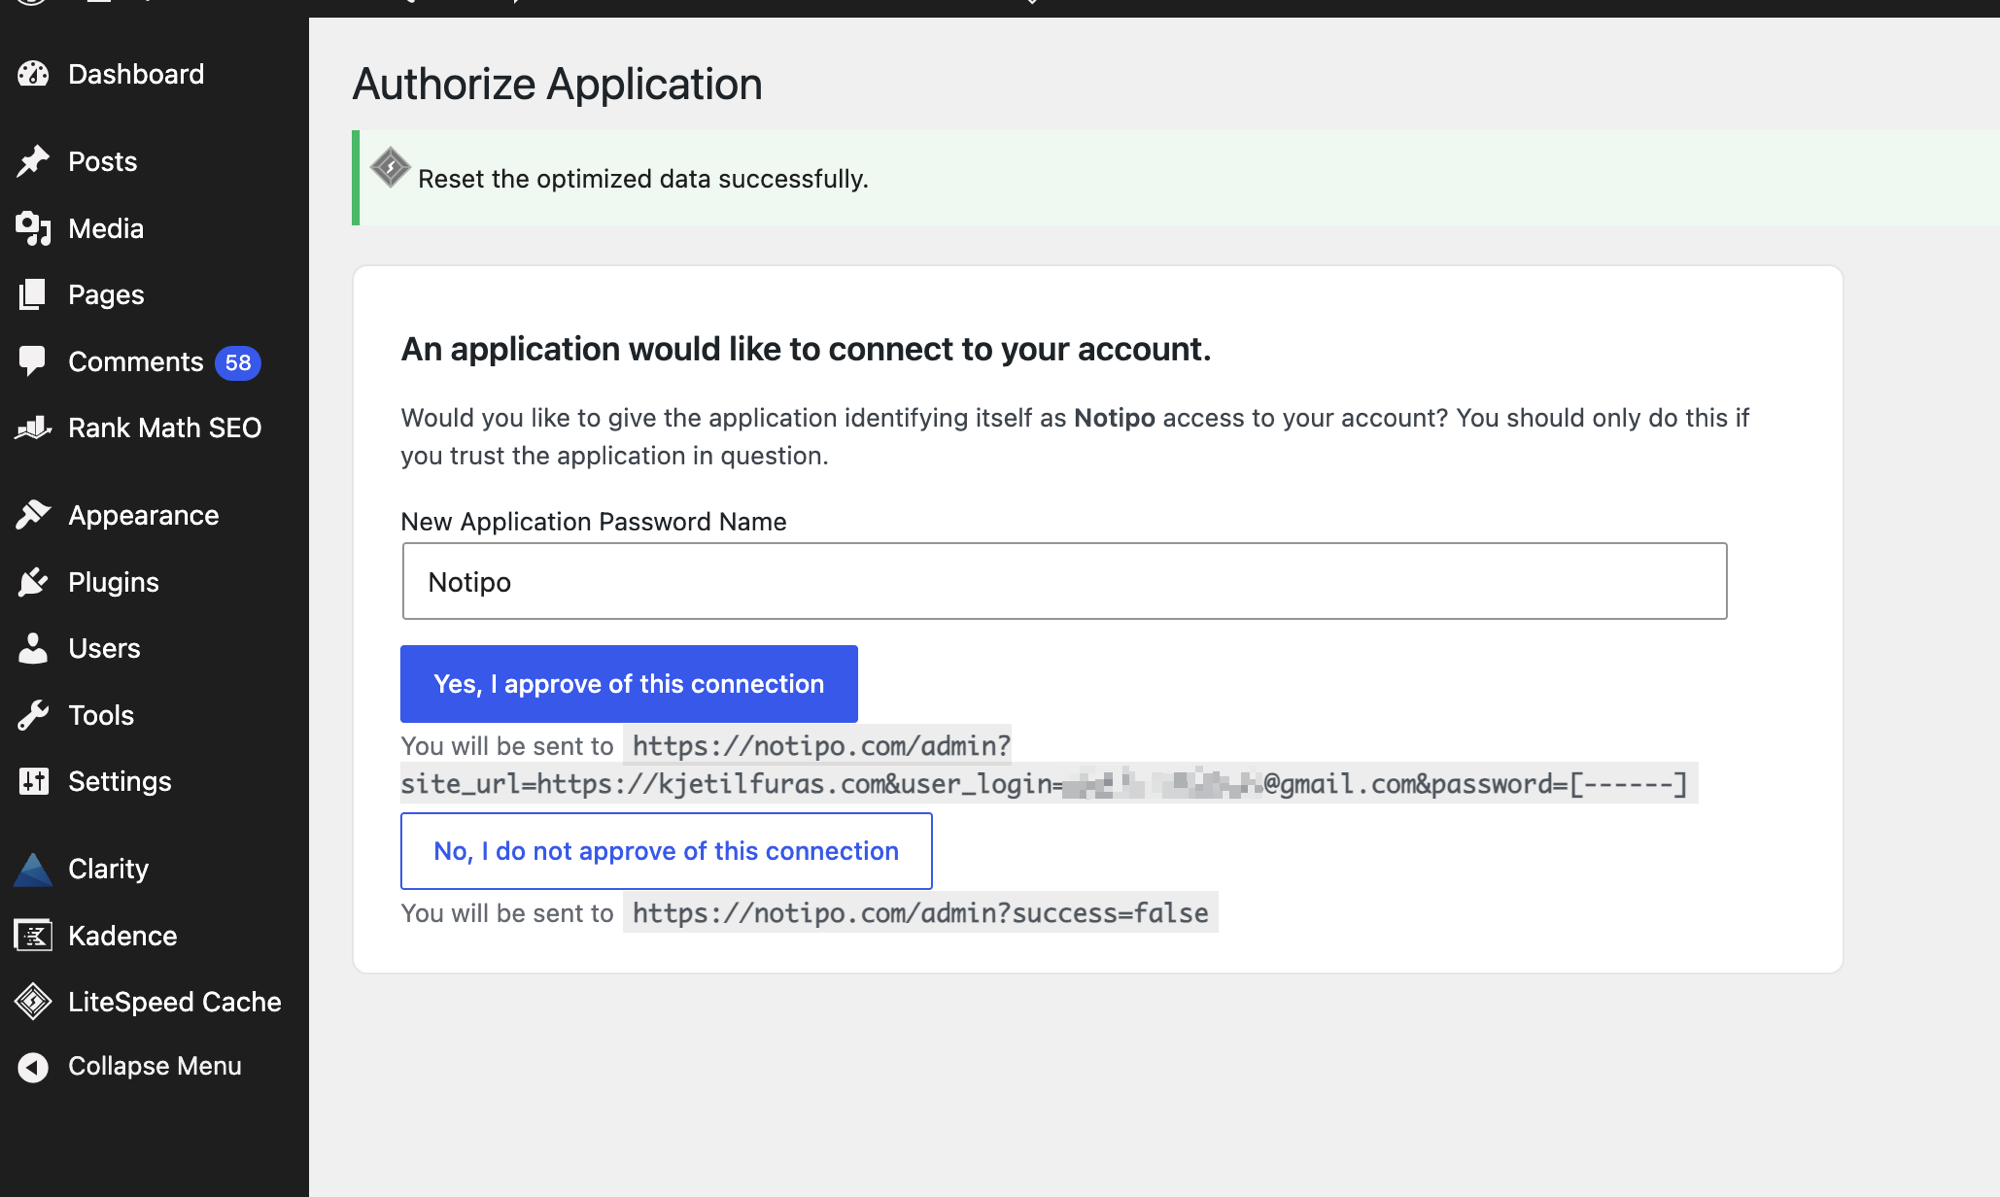
The token is generated by WordPress itself and stored encrypted in Notipo — revokable anytime from Users › Profile in wp-admin.
What Syncs Automatically
- Content — headings, paragraphs, lists, code blocks, callouts, quotes, toggles converted to Gutenberg blocks
- Images— downloaded from Notion and uploaded to your WordPress media library before Notion's S3 URLs expire
- SEO metadata — focus keyword and meta description written to Rank Math, Yoast SEO, SEOPress, or All in One SEO automatically (auto-detected)
- Featured images — generated automatically. Standard mode uses an Unsplash background with title overlay. AI mode (Pro) generates a unique image via Google Gemini. Full detail in the featured image automation guide.
- Categories and tags— mapped from Notion properties, created automatically in WordPress if they don't exist yet
- Code highlighting — language metadata from Notion code blocks preserved in WordPress
Programmatic Publishing (CLI + REST API + MCP)
Because Notipo runs outside WordPress, it exposes a REST API, CLI, and an MCP server for AI agents. One command publishes a full WordPress post:
notipo posts create \
  --title "Post Title" \
  --body "$(cat post.md)" \
  --category "Guides" \
  --seo-keyword "notion to wordpress" \
  --publish --wait
This is how AI coding agents (Claude Code, Cursor, custom workflows) publish blog posts on a schedule — no WordPress credentials needed in the agent, no plugin to maintain. A WordPress plugin can't do this because plugins live inside WordPress, not outside it.
Pricing
- Free — 5 posts/month, full image handling, SEO metadata, code highlighting
- Pro ($19/month) — Unlimited posts, AI featured images, instant sync, REST API access, 7-day free trial
If You Still Want a Plugin: WP Sync for Notion
WP Sync for Notion by WPConnect is the main WordPress plugin option. Install it from the WordPress plugin directory, connect your Notion workspace via an internal integration token, map properties to WordPress fields, and choose a sync frequency. Reasonable choice if your team prefers managing everything from inside the WordPress dashboard.
What It Handles
- Content import from Notion pages to WordPress posts
- Property mapping (title, category, tags, slug, publish date)
- Image downloading and re-upload to WordPress media library
- SEO plugin integration (Yoast and Rank Math) on the Pro plan
Trade-offs vs. the No-Plugin Approach
- Free tier only syncs individual pages, not full databases
- Instant sync (webhook-based) requires the Pro plan
- No automatic featured image generation — you still set featured images manually or upload them to Notion first
- Adds a plugin to your WordPress install (maintenance, updates, potential conflicts with theme or other plugins)
- No CLI or REST API for programmatic publishing from scripts or AI agents — the plugin lives inside WordPress, not outside it
- Pro plans start around $9/month for database sync, SEO integration, and webhook-based instant sync
Other Alternatives: Zapier, Make, Cloudpress
Zapier or Make
Zapier and Make can connect Notion to WordPress by triggering a WordPress REST API call when a Notion database item changes. Flexible but limited: content formatting is basic, images require extra workflow steps (Notion URLs expire), and there's no native SEO plugin integration. Works for simple text-only posts at low volume. Gets fragile quickly for anything more complex.
Cloudpress
Cloudpress exports Notion content to WordPress with good formatting fidelity. It's export-based rather than sync-based — you trigger each export manually. Priced per export ($0.50–$1 per article on lower plans). Best for occasional migrations or teams publishing at low frequency, not for ongoing automated publishing.
When to Skip the Plugin (Decision Guide)
Skip the plugin (recommended) if:
- You want a clean WordPress install with no extra plugins to maintain
- You want automatic featured image generation without manual design work
- You need SEO metadata (focus keyword, meta description) written automatically to your SEO plugin
- You publish from AI agents, scripts, or the CLI (plugins can't expose programmatic publishing)
- You want publishing triggered by a Notion status change with no manual steps
A plugin is still fine if:
- Your team prefers configuring everything from inside the WordPress dashboard
- You already maintain WordPress plugins and are comfortable with the upkeep
- You have an existing Notion internal integration you want to reuse
The Image Handling Problem
This is the most common failure point in any Notion to WordPress sync. Notion serves images through temporary signed S3 URLs. They expire after about an hour. If a sync tool embeds the Notion image URL directly in the WordPress post content, images break within an hour of publishing.
The correct behavior: download each image during the sync, upload it to your WordPress media library, and replace the Notion URL with the WordPress media URL in the post body. Both Notipo and WP Sync for Notion handle this. Zapier and Make do not handle it automatically — you need extra steps to transfer images.
Notipo also caches the image mapping. On re-syncs (when you update a post in Notion), it doesn't re-upload images that are already in the WordPress media library. This matters for posts that sync frequently.
One-Way Sync
Both WP Sync for Notion and Notipo are one-way: Notion to WordPress. Edits made directly in WordPress won't flow back to Notion. Notion is the source of truth; WordPress is the published output. If you need to update a post, update it in Notion and re-sync. This avoids merge conflicts and lost edits that two-way sync tools consistently struggle with.
FAQ
Do I really need a Notion to WordPress plugin?
No. WordPress already exposes a native REST API with Application Passwords (built in since WordPress 5.6, no plugin required). A sync service like Notipo connects via that native API in one click — no plugin to install, update, or maintain on WordPress.
Is the no-plugin approach less reliable than a Notion to WordPress plugin?
The opposite. Plugins run inside WordPress and can be broken by theme updates, PHP version changes, or other plugin conflicts. The Application Passwords flow uses official WordPress REST endpoints that ship with core — fewer moving parts and lower security surface than installing yet another plugin.
What happens to images when syncing from Notion to WordPress?
Notion serves images through temporary S3 URLs that expire after about an hour. Any sync tool must download the image and upload it to your WordPress media library. Notipo handles this automatically on every sync and caches the mapping to avoid re-uploading the same image. Without this, images break within hours of publishing.
Will the no-plugin approach write SEO metadata to my SEO plugin?
Yes. Notipo writes focus keywords, SEO titles, and meta descriptions directly to Rank Math, Yoast SEO, SEOPress, or All in One SEO — whichever you already have installed. It auto-detects the active plugin and uses its native REST API. No SEO plugin? Notipo still writes the standard meta fields.
When does a Notion to WordPress plugin actually make sense?
If your team prefers configuring everything from inside the WordPress dashboard, or if you have an existing Notion internal integration you want to reuse, WP Sync for Notion (a WordPress plugin) is a reasonable choice. For everything else — automatic featured images, programmatic publishing from AI agents, fewer plugins on your WordPress install — the no-plugin approach wins.
Get Started
Create a free Notipo account and connect your Notion workspace and WordPress site in under 10 minutes. The getting started guide walks through the full setup. For a free-tier comparison, see Notipo's 5-posts-per-month free plan.
Ready to publish from Notion?
Set up in 5 minutes. Free plan available — no credit card required.
Get Started Free